
Curate Exhibitions

Hanging Exhibitions in the virtual space
Always face the wall where you want to hang
Click on the Plus Sign (+) at the bottom centre of the image of the chosen piece from the list on the right to select it.
To scroll down use two fingers on the track pad
It will then show up on the wall and the Plus Sign (+) will change for a trash can / bin sign, used to remove the piece from the wall, as well as a Pencil Sign used to Edit / make changes to artworks.

Edit Artworks
Click on the Pencil Sign to Edit make changes to the artwork.
This tool will enable to you to make the following changes:
Frame Position - Artwork position on the wall. These numbers are for reference only. The “Bottom” number denotes the distance between the floor and the bottom of the artwork.

Frame Style - Some frames create unwanted reflections on some artworks. Choosing another frame will overcome the issue.
To choose a different frame, click on the green word “Change” Under the square frame Image. And choose different frames from the list. The Tick on the right bottom corner of the artwork will change to round when a frame is selected.


Frame Options
Framed or Unframed (untick for unframed artworks)
With or without glass (untick for unframed artworks)
With or without Frame Back (untick for unframed artworks)
With or without Tracking Light
Note: artworks set as “Unframed” will be presented over a plain white sided canvas board, regardless of the front colour of the artwork.


Frame Dimensions:
Frame Gap

Frame Width

Frame Depth
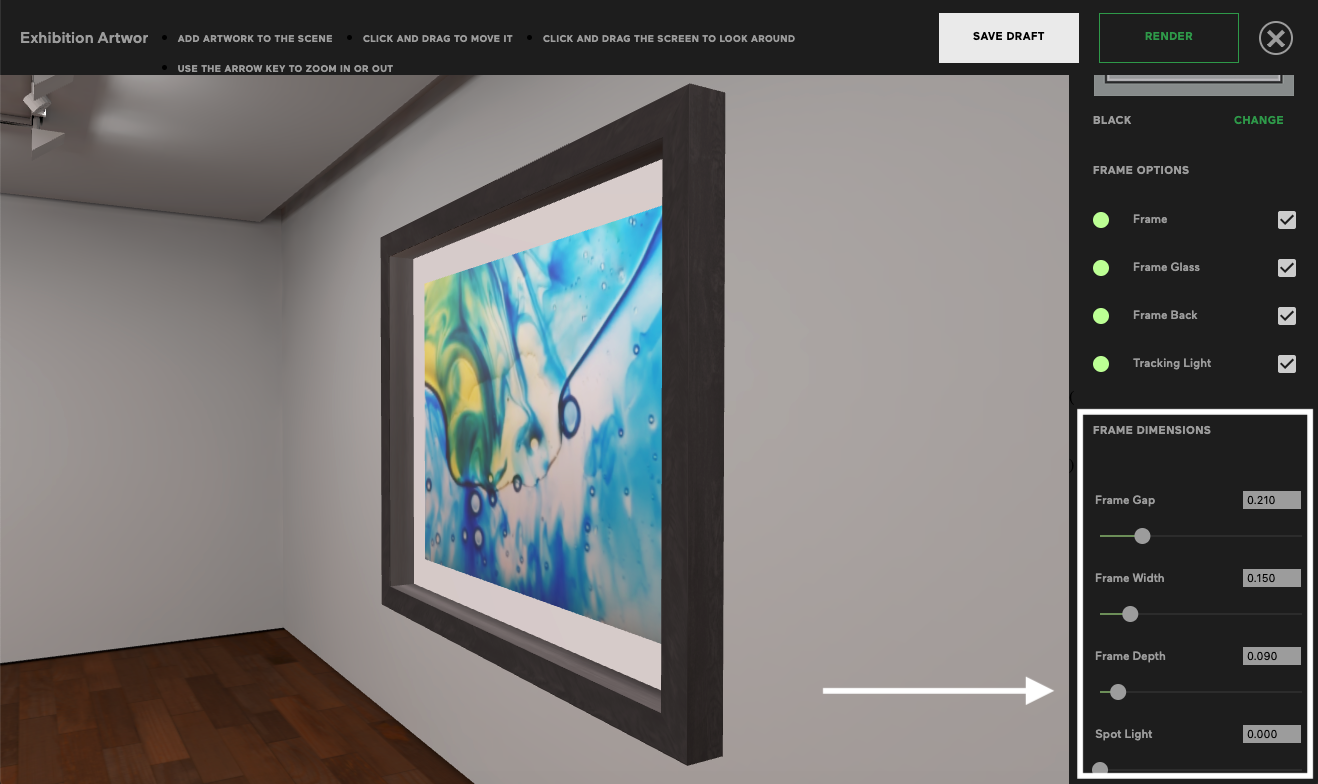
Spot Light Intensity (this will only work when the Track Light is ticked under Frame Options. The Light will follow the artwork wherever it’s placed on the wall).


Once satisfied with your exhibition and it has been approved by the relevant member of staff at the gallery, click on Save Draft at the top and then click Render and the exhibition will be sent to the Light Baking Cloud for processing to adjust Lighting, add shadows, increase resolution, etc. Rendering takes between 30mins and 1.5 hours. You will receive an email when your render is complete.


After the render is completed, check the exhibition without moving anything and Publish when satisfied.
If you would like to make any changes you can ‘Unlock’ the render.
Black squares will appear if you move any Artworks in a ‘locked’ render.
A prompt will appear for you to unlock and make the necessary changes. Click ‘Render’ again once you are happy and then finally Re - Publish the exhibition.
You can now change your ‘Exhibition visibility’ to ‘Public’.
Note: If an artwork is deleted or swapped by another newly created, the exhibition will have to be rehung and re-rendered.